Serial over SSH
The Serial over SSH plugin extends the power and simplicity of IO Ninja’s Serial plugin to remote Linux devices, enabling control of serial ports on machines like headless Raspberry Pi boards.
Basic Setup
Prerequisites
Enabling SSH
On most Linux machines, SSH is enabled by default. However, if it is not, you will need to enable it.
On Raspbian and many other popular distros, you can perform the following command:
systemctl enable --now sshd
For other Linux distributions, please refer to their documentation.
Installing the Hardware Client
The Serial over SSH plugin uses the IO Ninja Hardware Client (ioninja-hwc).
This hardware client needs to be installed and configured on the remote machine.
Note
See Installing the Hardware Client for instructions.
Identifying the Port
Later on, you will need to know what port your serial device is connected to.
On your Linux machine, perform the following command:
ioninja-hwc --ser-enum
The terminal should print all discovered ports, and you should see your serial device, similar to this:
/dev/ttyUSB0
This string of text will be entered into IO Ninja later, so make a note of it.
Alternatively, you can perform the following command:
dmesg --follow | grep -i tty
While the process is running, reconnect your device.
The terminal should print a new line, similar to this:
usb 1‑1.1: FIDI USB Serial Device converter now attached to ttyUSB0
In this case, the output indicates the port used is ttyUSB0, but yours may be different.
Serial SSH’ing into your Linux Machine with IO Ninja
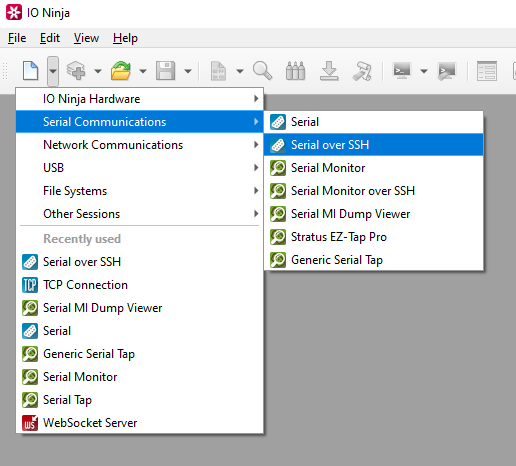
In IO Ninja, click the “New Session” dropdown and select a new “Serial over SSH” session.
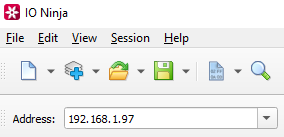
Type the host address of your remote Linux machine into the “Address:” field.
Type the port we identified earlier into the “Port:” field, prefixed by
/dev/.
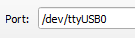
Click the “Open” button to the right of the “Port:” field to initiate a connection.

Note
You will be prompted for SSH credentials.
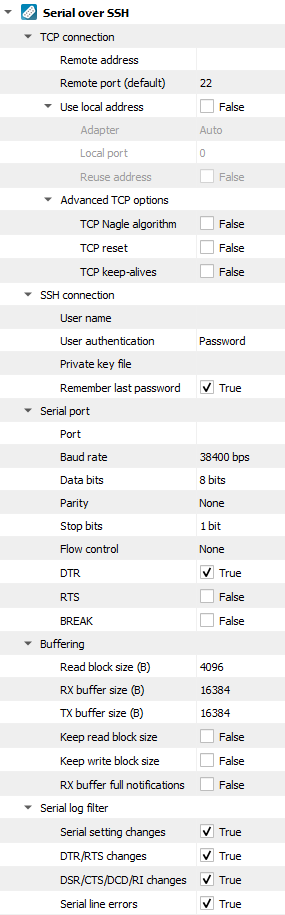
Adjust settings as needed via the “Settings” button (see “Settings” section below for details).
Note
Many of these settings are also available in the “Control” pane for easy access.
Communicate with your Serial Device as Usual
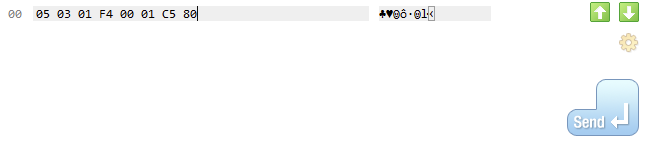
In the “Transmit” pane, type your binary packet and press “Send”.
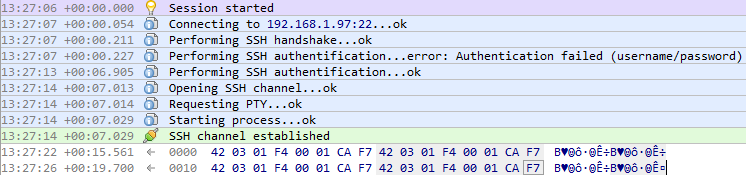
See all communications in the Ninja Scroll Engine.
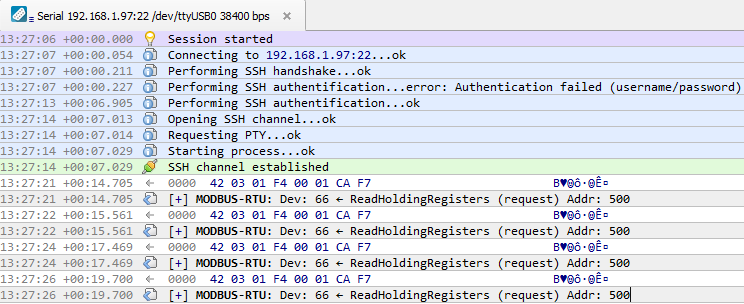
Add a layer such as Modbus Analyzer to make the most out of Modbus communications.
Settings
Setting |
Description |
Default |
|---|---|---|
Remote address |
Remote address to connect to. Can be specified via IPv4 ( |
|
Remote port (default) |
Remote port to connect to in cases when a port is not explicitly specified in Remote address. |
80 |
Use local address |
Bind socket to the specified local address. |
False |
Adapter |
Local network adapter to bind to. Pick one from the list of installed network adapters (or bind to all installed |
Auto |
Local port |
Local port to bind to. Setting this to |
8080 |
Reuse address |
Allow multiple sockets to share the same local address. Maps to the |
False |
TCP Nagle algorithm |
Delay transmission to reduce the number of small |
False |
TCP reset |
Drop TCP connections abruptly with a |
False |
TCP keep-alives |
Detect connection loss with |
False |
User name
|
User name for SSH authentication. |
|
User authentication
|
SSH authentication method (password or private key) |
Password |
Private key file
|
Private key file for SSH authentication (PEM format). |
|
Remember last password
|
Re-use the last entered password during subsequent connect attempts. |
True |
Port |
The port that should be used. |
|
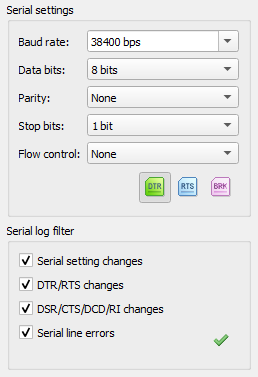
Baud rate |
The serial baud rate. |
38400 bps |
Data bits |
Serial data bit count (word size). See available options. |
8 bits |
Parity |
Serial parity check type. See available options. |
None |
Stop bits |
Serial stop bit count. See available options. |
1 bit |
Flow control |
Serial flow control. See available options. |
None |
DTR |
State of the DTR (Data-Terminal-Ready) modem control line. |
True |
RTS |
State of the RTS (Request-to-Send) modem control line. |
False |
BREAK |
Enable the BREAK condition on the TX line. |
False |
Read block size (B) |
The size of each individual read block submitted to the underlying transport. |
4KB |
RX buffer size (B) |
The full size of the incoming data ( |
16KB |
TX buffer size (B) |
The full size of the outbound data ( |
16KB |
Keep read block size |
Don’t merge read blocks in RX buffer. Incoming data blocks coming in quick succession can be merged together so that IO Ninja writes them to log as a whole. When this option is set to |
False |
Keep write block size |
Don’t merge write blocks in |
False |
RX buffer full notifications |
Toggle warnings in log about the incoming data ( |
False |
Serial setting changes |
Toggle notifications about serial setting (baud rate, data size, parity, stop bits, flow control) changes in the log. |
on |
DTR/RTS changes |
Toggle notifications about control line ( |
on |
DSR/CTS/DCD/RI changes |
Toggle notifications about status line ( |
on |
Serial line errors |
Toggle warning about serial line errors ( |
on |
Data Bit Options
Option |
|---|
5 bits |
6 bits |
7 bits |
8 bits |
Parity Options
Option |
Description |
|---|---|
None |
No parity bit is used |
Odd |
Odd parity (parity bit is set when the number of logical ones in the UART frame is odd). |
Even |
Even parity (parity bit is set when the number of logical ones in the UART frame is even). |
Mark |
Parity bit is present and always set. |
Space |
Parity bit is present and always clear. |
Stop Bit Options
Option |
|---|
1 bit |
1.5 bits |
2 bits |
Flow Control Options
Option |
Description |
|---|---|
None |
No flow control. |
RTS/CTS |
Hardware flow control using CTS and RTS lines. |
XON/XOFF |
Software flow control using XON and XOFF lines. |
FAQ (Frequently Asked Questions)
1. How can I automatically append line ending characters?
Appending line ending characters is easily achieved using the TX Modifier Layer plugin.
To automatically append line endings:
Add the TX Modifier layer to your serial session.
In the layer settings, enable the Append suffix option.
Enter the desired suffix (e.g.,
\r\n) in the configuration.
This will automatically add your specified line endings to all outgoing transmissions—saving you from typing them manually each time. The TX Modifier layer also supports many other advanced transformations, but you can keep it simple if you only need suffixes.
IO Ninja timestamps entire data blocks as they are received from the operating system, not individual bytes. Since bytes within a block arrive in quick succession, the block timestamp provides a reliable indication of when the data was received. Although you cannot assign timestamps to each CR-terminated line directly, the existing timestamps offer millisecond-level accuracy and can be exported for use in test or simulation systems.