Writing a Protocol Analyzer Plugin (legacy)
In this tutorial, we will show you how to write a protocol analyzer for our artificial make-belief protocol TutoProto.
TutoProto Analyzer Project
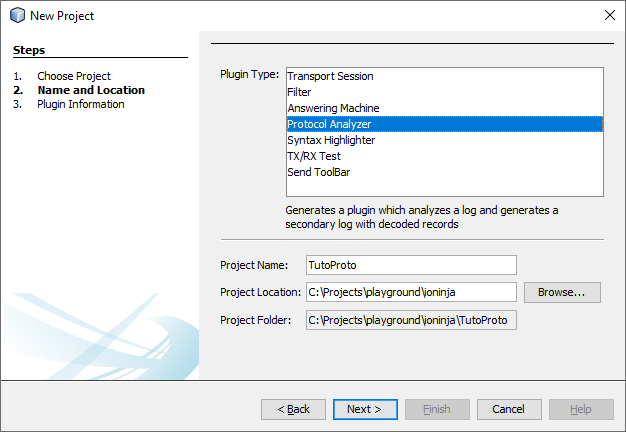
Start the IO Ninja IDE, click menu File/New Project, choose the category IO Ninja and the project type Plugin Project. On the next screen, set plugin type to Protocol Analyzer, enter TutoProto as the project name, choose the location for your plugin, and hit Next.
On the next screen, enter appropriate informational strings, and enter TutoProto as the layer prefix – so that all class and function names are named appropriately.
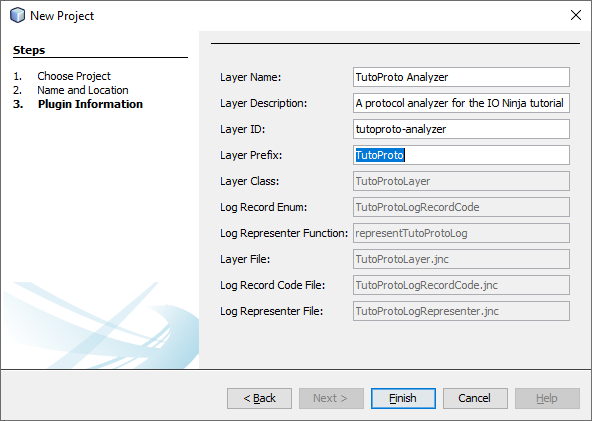
Hit Finish, and the skeleton for a new protocol analyzer will be generated.
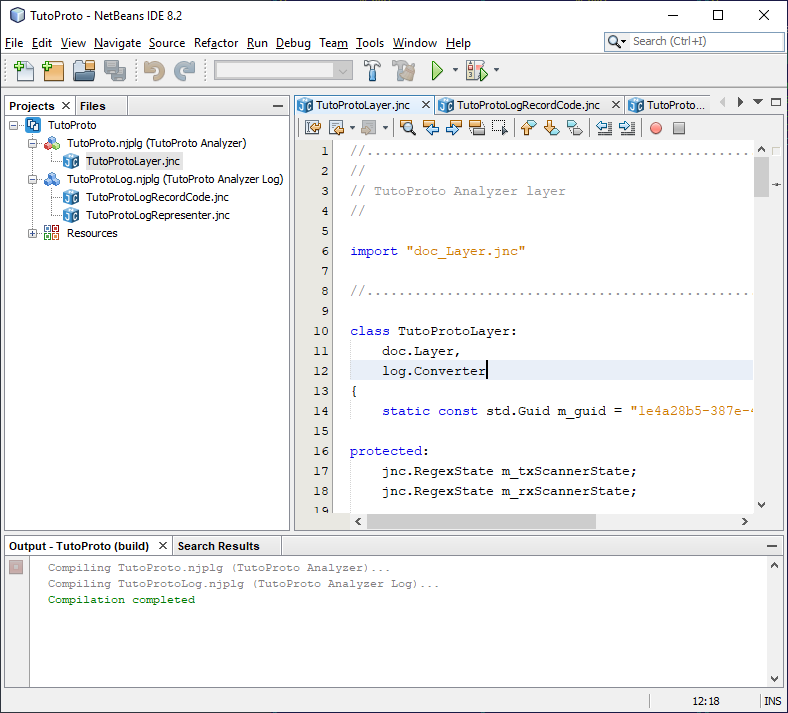
By default, the wizard generates two plugins – one layer plugin to convert the original log into the one containing decoded protocol messages, and one log representer plugin to generate the visual representation for those protocol messages.
The files generated by the wizard for our project are:
| File | Description |
|---|---|
| TutoProto.njplg | Plugin file for the analyzer layer |
| TutoProtoLayer.jnc | Jancy source file of the analyzer layer |
| TutoProtoLog.njplg | Plugin file for the log representer |
| TutoProtoLogRecordCode.jnc | Jancy source file with plugin-specific log record codes |
| TutoProtoLogRepresenter.jnc | Jancy source file for a representor of plugin-specific log record codes |
| images/ | Icons and other visual resources |
Note
Strictly speaking, the log representer plugin is not essential – you can always use a simple plain text representation for decoded messages and embed this text right into the converted log. However, the approach with a dedicated representer is much more powerful, as you will see below.
Analyzer Layer Plugin
The generated protocol analyzer extracts everything between < and > from both TX and RX streams using Jancy regular expression switch statement. That’s not quite what we need, so we will scratch most of the generated code.
Note
Even though we are scratching the logic of the generated analyzer, we are going to keep the general structure of the project, so the wizard is still very useful.
After the clean-up, the starting point of our analyzer should look like this:
import "doc_Layer.jnc"

class TutoProtoLayer:
    doc.Layer,
    log.Converter  {

    static const std.Guid m_guid = "1e4a28b5-387e-4a3f-bb59-9e0bbdf21020";

public:
    construct(doc.PluginHost* pluginHost) {
        basetype1.construct(pluginHost);
        pluginHost.m_log.addConverter(this, &m_guid);
    }

    override bool convert(
        log.Writer* writer,
        uint64_t timestamp,
        uint64_t recordCode,
        void const* p,
        size_t size
    ) {
        return false;
    }
}
Let’s give a brief breakdown of what’s going on here:
class TutoProtoLayer:
    doc.Layer,
    log.Converter {
    ...
}
All layer plugins must be derived from the doc.Layer class. Since we are writing a protocol analyzer, we also need to convert the original raw log into the one with decoded protocol messages, so we must implement the log.Converter interface. It doesn’t actually have to be implemented in the main layer class – but why not?
static const std.Guid m_guid = "1e4a28b5-387e-4a3f-bb59-9e0bbdf21020";

construct(doc.PluginHost* pluginHost) {
    basetype1.construct(pluginHost);
    pluginHost.m_log.addConverter(this, &m_guid);
}
We are going to write a dedicated log representer for TutoProto, so the converted log must be marked as requiring this representer. Log representers in IO Ninja are identified with GUID-s – therefore, we declare a std.Guid constant and pass it to log.Log.addConverter.
override bool convert(
    log.Writer* writer,
    uint64_t timestamp,
    uint64_t recordCode,
    void const* p,
    size_t size
) {
    return false;
}
This method is the main entry point of our analyzer. convert is called for each record in the original log, and it can emit zero or more records into the output (converted) log by calling log.Writer.write on the writer parameter. If convert returns false the original record is written to the output log as is.
Now, let’s write a suitable convert for our TutoProto.
Buffering
TutoProto can work over TCP or serial, and these transports don’t guarantee delivery of transmitted packets as a whole. What this meanse, is that when one side transmits a packet of 10 bytes, the other side can receive this packet as two or more chunks (and in case of serial, some bytes may be even lost).
Therefore, before analysis, we need to buffer the packet. We are going to use the built-in class std.Buffer from the Jancy standard library. We need two independent buffers – for TX and RX data streams:
import "std_Buffer.jnc"

class TutoProtoLayer:
    doc.Layer,
    log.Converter {
    ...
    std.Buffer m_txBuffer;
    std.Buffer m_rxBuffer;
    ...
TutoProto packets start with a fixed header TutoProtoHdr which contains the information about the full size of the packet in the m_size field. Therefore, our buffering logic should be as follows:
- Buffer
sizeof(TutoProtoHdr) - Extract
TutoProtoHdr.m_size - Keep buffering until we have
TutoProtoHdr.m_sizebytes
Keep in mind that we need to follow this logic independently for TX and RX streams. Here we go:
bool TutoProtoLayer.convert(
    log.Writer* writer,
    uint64_t timestamp,
    uint64_t recordCode,
    void const* p,
    size_t size
) {
    std.Buffer* buffer;

    switch (recordCode) {
    case log.StdRecordCode.Tx:
        buffer = &m_txBuffer;
        break;

    case log.StdRecordCode.Rx:
        buffer = &m_rxBuffer;
        break;

    default:
        return false; // don't convert other records
    }

    void const* p0 = p;
    void const* end = p + size;
    while (p < end) {
        // first, we need detect the start of a packet (STX)

        if (!buffer.m_size) {
            char const* stx = memchr(p, 0x02, end - p);
            if (!stx) // no more packets in this log record
                break;

            buffer.append(stx, 1);
            p = stx + 1;
        }

        // keep buffering the header

        if (buffer.m_size < sizeof(TutoProtoHdr)) {
            size_t leftoverRx = end - p;
            size_t leftoverHdr = sizeof(TutoProtoHdr) - buffer.m_size;

            if (leftoverRx < leftoverHdr) { // not yet
                buffer.append(p, leftoverRx);
                break;
            }

            buffer.append(p, leftoverHdr);
            p += leftoverHdr;
        }

        // keep buffering the rest of the packet now that we know its full size

        TutoProtoHdr const* hdr = (TutoProtoHdr const*)buffer.m_p;
        if (hdr.m_size > sizeof(TutoProtoHdr)) {
            size_t leftoverRx = end - p;
            size_t leftoverPacket = hdr.m_size - buffer.m_size;

            if (leftoverRx < leftoverPacket) { // not yet
                buffer.append(p, leftoverRx);
                break;
            }

            buffer.append(p, leftoverPacket);
            p += leftoverPacket;
        }

        // OK, packet is fully buffered! First, write the original data...

        if (p0 < p) {
            writer.write(timestamp, recordCode, p0, p - p0);
            p0 = p;
        }

        // ... and then, information about the packet

        writer.write(
            timestamp,
            log.StdRecordCode.HyperText,
            $"\e[1mTutoProto:\n"
            $"    command:\t\e[34m%d\n"
            $"    flags:\t\e[34m0x%02x\n"
            $"    id:\t\e[34m0x%02x\n"
            $"    size:\t\e[34m%d"(
            hdr.m_command,
            hdr.m_flags,
            hdr.m_id,
            hdr.m_size
        ));

        // prepare for the next packet

        buffer.clear();
    }

    // write the original data

    if (p0 < end)
        writer.write(timestamp, recordCode, p0, end - p0);

    return true;
}
Note
You can use ANSI escape sequences to colorize your output. For a detailed documentation on ANSI color codes, please refer to https://en.wikipedia.org/wiki/ANSI_escape_code#Colors
This analyzer is already quite useful – it detects TutoProto packets in the stream, buffers them, and writes some basic information into the log. Of course, it’s possible to keep the same structure of the analyzer and extend it by adding extra information about particular commands and replies.
But we are going to introduce a better approach to represent information about packets once they are buffered. We will write those buffered packets to the log as is, and then show information about those packets from within a dedicated log representer.
Log Representer Plugin
Log representers are functions which take a log record as a parameter and produce a visual representation for this record by adding log lines via the log.Representation object.
Note
The actions of a log representer function should only depend on the log record passed to it as a parameter; it shouldn’t access any global variables or properties (e.g. to look up for some “settings”).
In order for your log representer to be called, we need to define unique log records and register those record codes with IO Ninja. Use IO Ninja IDE for defining new log record codes for your log plugin:
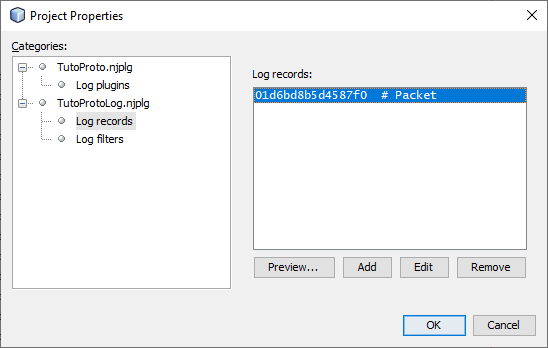
In our case, we only need one log record for the buffered TutoProto packet: TutoProtoLogRecordCode.Packet.
Note
As of now, the IDE does not automatically update your source code, so make sure your enum xxxLogRecordCode contains the newly added log record codes. In our case, the log record code enum should look like this:
enum TutoProtoLogRecordCode: uint64_t {
    Packet = 0x01d6bd8b5d4587f0,
}
Once all necessary record codes are defined, let’s write the representer function. A typical representer function looks like this:
bool representMyLog(
    log.Representation* representation,
    uint64_t recordCode,
    void const* p,
    size_t size,
    uint_t foldFlags
) {
    switch (recordCode) {
    case MyLogRecordCode.Record1:
        // generate representation for Record1
        break;

    case MyLogRecordCode.Record2:
        // generate representation for Record2
        break;

    ...

    default:
        return false;
    }

    return true;
}
In our case, we only have a single record code, so switch is not necessary. Let’s move the code for representing the buffered packet from TutoProtoLayer.convert:
bool TutoProtoLayer.convert(...) {
    ...

    while (p < end) {
        ...

        // ... and then, information about the packet

        writer.write(
            timestamp,
            TutoProtoLogRecordCode.Packet,
            buffer.m_p,
            buffer.m_size
        );

        // prepare for the next packet

        buffer.clear();
    }

    ...
}
And put it into representTutoProtoLog:
bool representMyLog(
    log.Representation* representation,
    uint64_t recordCode,
    void const* p,
    size_t size,
    uint_t foldFlags
) {
    if (recordCode != TutoProtoLogRecordCode.Packet)
        return false;

    TutoProtoHdr const* hdr = (TutoProtoHdr const*)p;
    representation.m_lineAttr.m_iconIdx = log.StdLogIcon.Packet;
    representation.m_lineAttr.m_backColor = ui.StdColor.PastelGray;

    representation.addHyperText(
        $"\e[1mTutoProto:\n"
        $"    command:\t\e[34m%d\n"
        $"    flags:\t\e[34m0x%02x\n"
        $"    id:\t\e[34m0x%02x\n"
        $"    size:\t\e[34m%d"(
        hdr.m_command,
        hdr.m_flags,
        hdr.m_id,
        hdr.m_size
    ));

    // show raw data

    representation.m_lineAttr.m_textColor = ui.StdColor.BrightBlack;
    representation.m_lineAttr.m_backColor = ui.StdColor.White;
    representation.addBin(p, size);
    return true;
}
Here you may already notice why it is more benefitial to use a dedicated log representer. This way, we can better control visual aspects of our representatin, e.g. by changing background color and adding icons to the lines in the log.
But even more importantly, from a log representer we can automatically generate representation for struct-s with the help of Jancy retrospection facilities. Observe:
First, import the implementation of the default struct-representer:
import "log_RepresentStruct.jnc"
Note
Since all IO Ninja scripts are open-source, you can study how the default struct-representer is working under the hood by inspecting sources of log.representStruct located in scripts/common/log_RepresentStruct.jnc.
Now, let’s replace manual representation of TutoProtoHdr with automated one by employing log.representStruct:
bool representTutoProtoLog(...) {
    ...
    representation.addHyperText("\e[1mTutoProto:");
    log.representStruct(representation, typeof(TutoProtoHdr),,, p,,, 0);
    ...
}
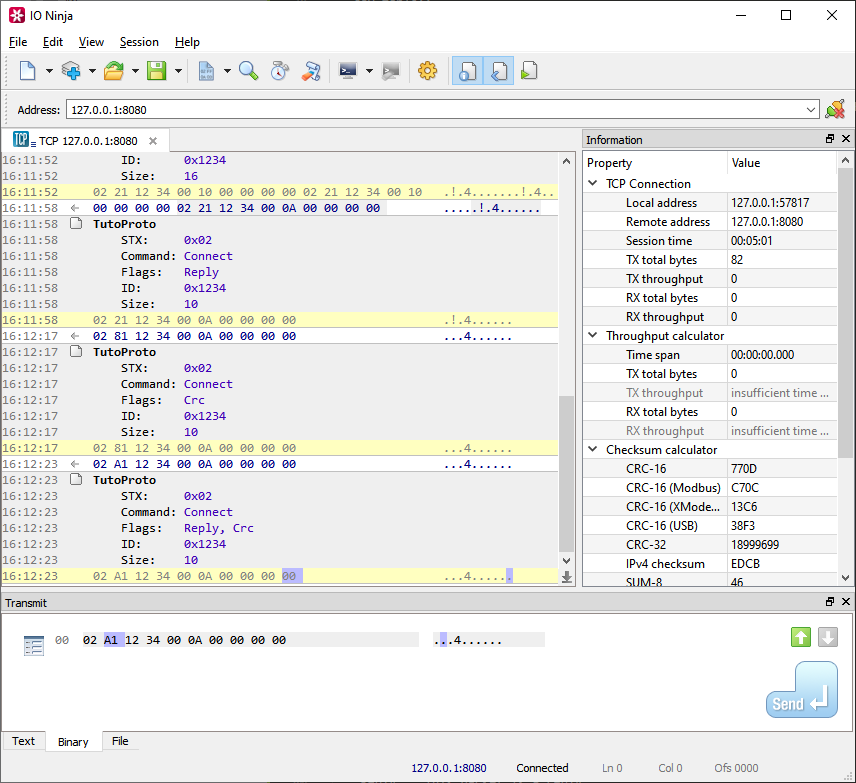
Run this code and observe how it automatically generates representation for struct TutoProtoHdr – you can even click individual fields and see which bytes hold those fields!
Visual Attributes
Using attributes, we can polish the representation of our struct without any coding. Observe:
struct TutoProtoHdr {
    [ displayName = "STX" ]
    uint8_t m_stx;

    [
        displayName = "Command",
        displayType = typeof(TutoProtoCommand)
    ]
    uint8_t m_command : 5;

    [
        displayName = "Flags",
        displayType = typeof(TutoProtoFlags)
    ]
    uint8_t m_flags   : 3;

    [
        displayName = "ID",
        formatSpec = "0x%04x"
    ]
    bigendian uint16_t m_id;

    [
        displayName = "Size"
    ]
    bigendian uint16_t m_size;
}
Representing Command-Specific Data
In our protocol (and in most real-world ones), different commands have different parameters. Of course, it’s always possible to write a good-old switch statement to branch between those commands.
For the sake of turorial, let’s show an alternative solution. We can add attributes to the TutoProtoCommand and use those attributes to dynamically select the proper representation for a particular command. Observe:
enum TutoProtoCommand: uint8_t {
    [ representReply = representTutoProtoReply_GetVersion ] // command has no params
    GetVersion,

    [ representCommand = representTutoProtoCommand_Connect ] // reply has no params
    Connect,

    Disconnect,  // command or reply has no params

    [
        representCommand = representTutoProtoCommand_Read,
        representReply = representTutoProtoReply_Read,
    ]
    Read,

    [ representCommand = representTutoProtoCommand_Write ] // reply has no params
    Write,
}
Now we can write helper detail representer functions for different commands and invoke those dynamically:
bool representTutoProtoLog(...) {
    ...

    // represent command-specific details

    typedef char const* GetTutoProtoDigestFunc(
        void const* p,
        size_t size
    );

    jnc.EnumConst* commandEnumConst = typeof(TutoProtoCommand).findConst(hdr.m_command);
    RepresentTutoProtoDetailFunc* representDetailFunc;

    if (hdr.m_flags & TutoProtoFlags.Error)
        representDetailFunc = representTutoProtoError;
    else if (commandEnumConst)
        representDetailFunc = commandEnumConst.findAttributeValue(
            (hdr.m_flags & TutoProtoFlags.Reply) ?
                "representReply" :
                "representCommand"
        );

    if (representDetailFunc) {
        bool result = representDetailFunc(representation, hdr + 1, size - sizeof(TutoProtoHdr));
        if (!result)
            representation.addHyperText("[ INVALID ]");
    }

    ...
}
Then we can write command-specific functions to represent details of all commands. These functions may look something like this:
bool representTutoReply_GetVersion(
    log.Representation* representation,
    TutoProtoHdr const* hdr,
    size_t size
) {
    if (size < sizeof(TutoProtoVersion))
        return false;

    log.representStruct(
        representation,
        typeof(TutoProtoVersion),,,
        p,
        sizeof(TutoProtoHdr),, // base offset for 'clickable' fields
        0
    );

    return true;
}
Making Packet Records Foldable
Real-world protocols may be rather complex, and commands may include a lot of information for display. In most cases, showing all that information immediately in the main log is not desireable – too much information is just as bad as not enough information.
Let’s demonstrate how to hide all the details until the user explicitly requests those.
The logging engine of IO Ninja natively supports foldable records. In order to utilize this facility, foldable records must be explicitly marked with log.RecordCodeFlags.Foldable (that’s the highest order bit), so first of all, let’s revisit the project properties and add 0x8000000000000000 to the Packet packet record code. Also, don’t forget to update enum TutoProtoLogRecordCode:
enum TutoProtoLogRecordCode: uint64_t {
    Packet = 0x01d6bd8b5d4587f0 | log.RecordCodeFlags.Foldable, // 0x81d6bd8b5d4587f0
}
Now, we can use foldFlags from our representer to switch between folded and unfolded representations. To modify foldFlags we need to embed specially formatted hyperlinks into the log lines. When user clicks on those hyperlinks, foldFlags will be modified accordingly, and our log representer will be called again to reflect this change in foldFlags.
Here’s a boilerplate of a representor for a foldable record:
bool representTutoProtoLog(
    log.Representation* representation,
    uint64_t recordCode,
    void const* p,
    size_t size,
    uint_t foldFlags
) {
    if (recordCode != TutoProtoLogRecordCode.Packet)
        return false;

    if (foldFlags & 1) {
        representation.addHyperText(
            "[\e^-1\e[34m-\e[m] Detailed representation\n"
            "    More detalis...\n"
            "    Even more detalis\n"
        );
    } else {
        representation.addHyperText("[\e^+1\e[34m+\e[m] Single-line digest");
    }
}
The sequence \e^N...\e[m generates a hyperlink which will set (+) or clear (-) the bit N in the fold flags of the record. In the example above we use 1 to utilize the very first bit of fold flags.
Note
It’s possible to encode up to 32 levels of folds (foldFlags is a 32-bit integer). If that’s required, for deeper fold levels use \e^+2/\e^-2, \e^+4/\e^-4, \e^+8/\e^-8, etc. In most cases, however, one fold level is enough.
Since single-line digest can also be command-specific, let’s add extra attributes to TutoProtoCommand constants so that we can use the function pointer approach (of course, the traditional switch statement is also possible).
enum TutoProtoCommand: uint8_t {
    [
        representReply = representTutoProtoReply_GetVersion,
        getReplyDigest = getTutoProtoReplyDigest_GetVersion
        // command has no params
    ]
    GetVersion,

    ...
}

bool representTutoProtoLog(
    log.Representation* representation,
    uint64_t recordCode,
    void const* p,
    size_t size,
    uint_t foldFlags
) {
    if (recordCode != TutoProtoLogRecordCode.Packet)
        return false;

    if (!(foldFlags & 1)) { // show digest only
        typedef char const* GetTutoProtoDigestFunc(
            void const* p,
            size_t size
        );

        GetTutoProtoDigestFunc* getDigestFunc;

        if (hdr.m_flags & TutoProtoFlags.Error)
            getDigestFunc = getTutoProtoErrorDigest;
        else if (commandEnumConst)
            getDigestFunc = commandEnumConst.findAttributeValue(
                (hdr.m_flags & TutoProtoFlags.Reply) ?
                    "getReplyDigest" :
                    "getCommandDigest"
            );

        representation.addHyperText($"[\e^+1\e[34m+\e[m] \e[1mTutoProto\e[m %1 %1"(
            commandEnumConst ? commandEnumConst.m_name : null,
            getDigestFunc ? getDigestFunc(hdr + 1, size - sizeof(TutoProtoHdr)) : null
        ));

        return true;
    }

    // represent details
    representation.addHyperText("[\e^-1\e[34m-\e[m] \e[1mTutoProto");
    ...
}
Digest-generating functions may looks something like this:
char const* getTutoProtoReplyDigest_GetVersion(
    void const* p,
    size_t size
) {
    if (size < sizeof(TutoProtoVersion))
        return null;

    TutoProtoVersion const* version = (TutoProtoVersion const*)p;
    return $"%1.%2.%3"(version.m_major, version.m_minor, version.m_patch);
}
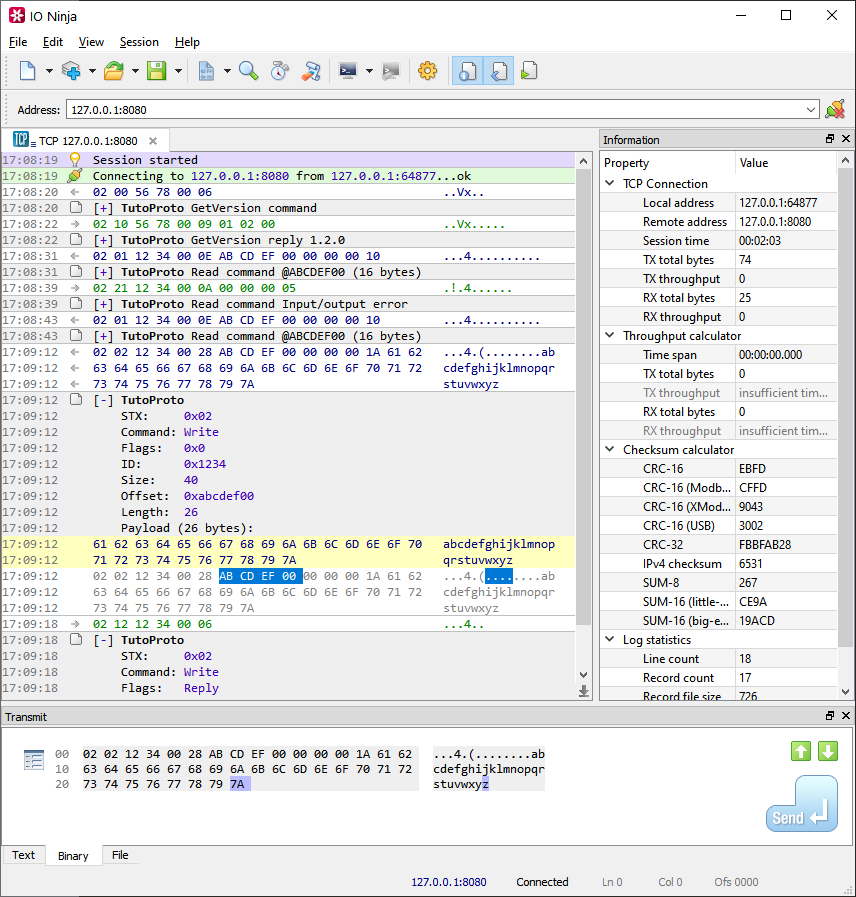
The finished analyzer produces the following results:
Download
Full sources of the TutoProto analyzer plugin can be downloaded via the links below:
| File | URL |
|---|---|
TutoProto source (.7z) |
https://ioninja.com/downloads/samples/legacy/TutoProto.7z |
TutoProto source (.tar.xz) |
https://ioninja.com/downloads/samples/legacy/TutoProto.tar.xz |